Table of contents
- Requirements to Create Click-to-WhatsApp Ads
- Steps to Create Click-to-WhatsApp-Ads in Vyapar Ads Manager
- 1. Go to Meta Ads
- 2. Continue with Facebook
- 3. Select Facebook Ad Account
- 4. Link your WhatsApp API Number
- 5. WhatsApp Number Linked Successfully
- 6. Fields that You Need to Fill
- 7. Create Your Click-to-WhatsApp-ad
- 8. Fill in Your Ad Demographics & Targeting
- 9. Select a Budget
- 10. Click Create to Publish Ad
- 11. CTWA Ad in Progress
- 12. Your CTWA Ad is LIVE 🎉🎊
- 13. Monitor Your Ad Analytics
How to Set Up Click-to-WhatsApp-Ads in Vyapar Ads Manager?
Share the Article:
Estimated reading time: 8 minutes
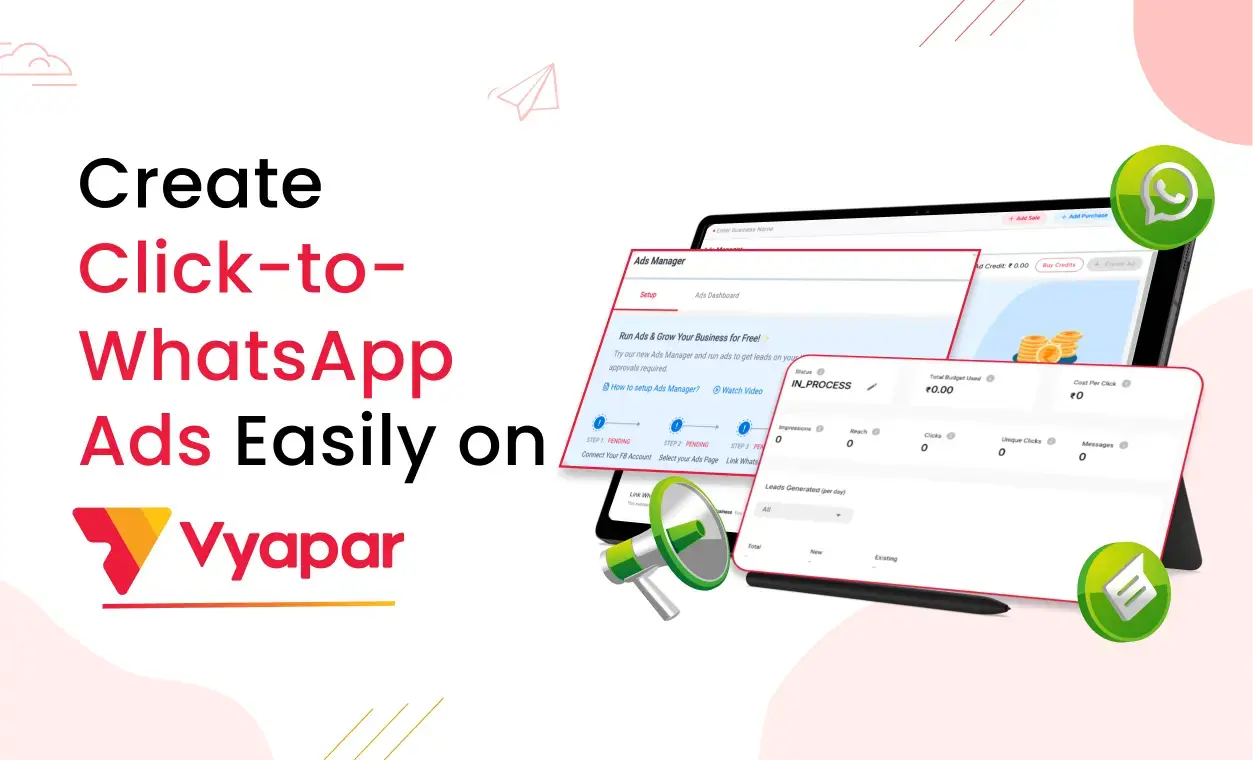
Do you wish to run Ads on Facebook/ Instagram that click directly to WhatsApp?
You can now Create & Run Facebook/ Instagram Ads directly via the Vyapar Ads Manager Platform by clicking which will take users to your WhatsApp Business API number.
With this feature, you can:
✅ Drive 3-5X Leads Instantly
✅ Reduce Cost Per Lead by 60%
✅ Identify & Convert hot leads by Retargeting
✅ Get the user’s Name & WhatsApp number instantly
✅ No more hassle to go to the Facebook Platform for creating CTWA Ads.
In this tutorial, we’ll tell you:
- How to easily create Click-to-WhatsApp-Ads (CTWA) on the Vyapar Ads Manager platform
- Track Analytics for your CTWA Campaigns
Requirements to Create Click-to-WhatsApp Ads
- Facebook Page
All you need to create Click-to-WhatsApp ads on Vyapar Ads Manager is a Facebook page using which you wish to run ads for your business.
Steps to Create Click-to-WhatsApp-Ads in Vyapar Ads Manager
You can either watch the below video or read the guide to learn how to create Click to WhatsApp ads using Vyapar Ads Manager.
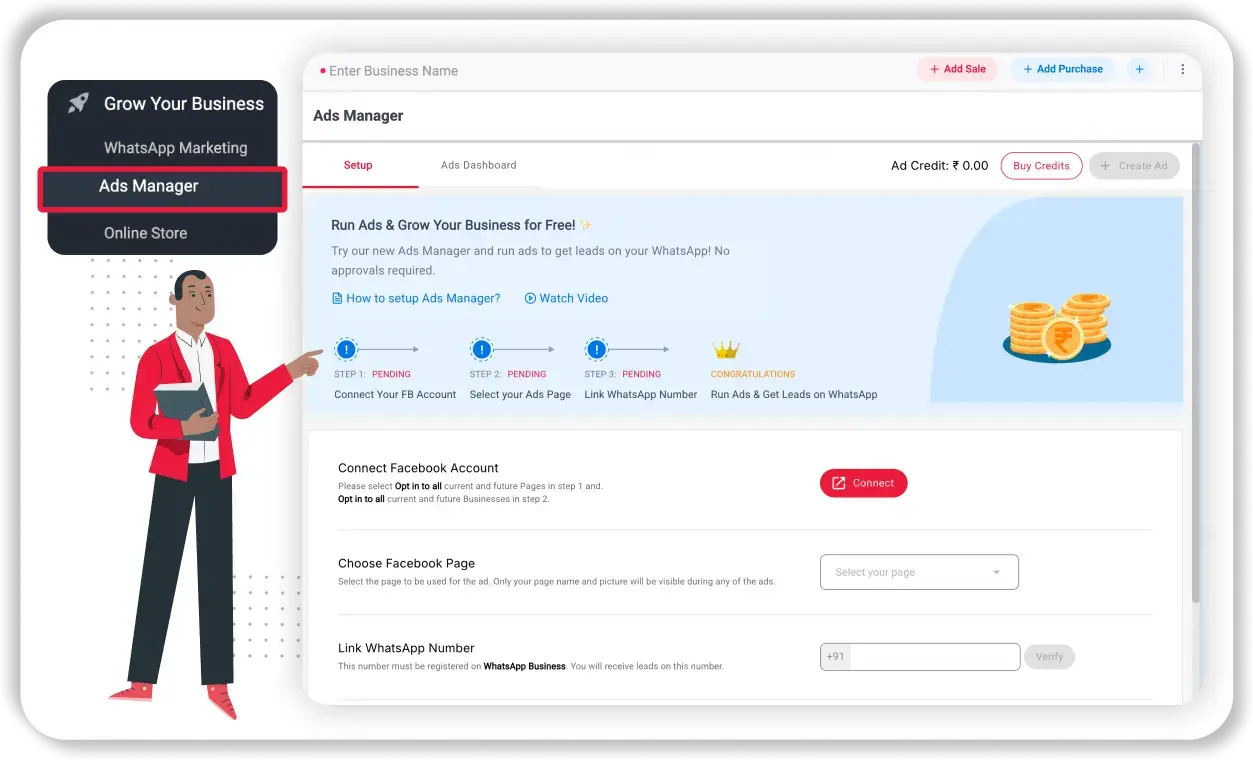
1. Go to Meta Ads
To create Click-to-WhatsApp ads, open the Vyapar and navigate to Ads Manager.
2. Continue with Facebook
Under Setup, click on “Continue with Facebook.”. Next, select the business manager you wish to connect to and click “Continue.”
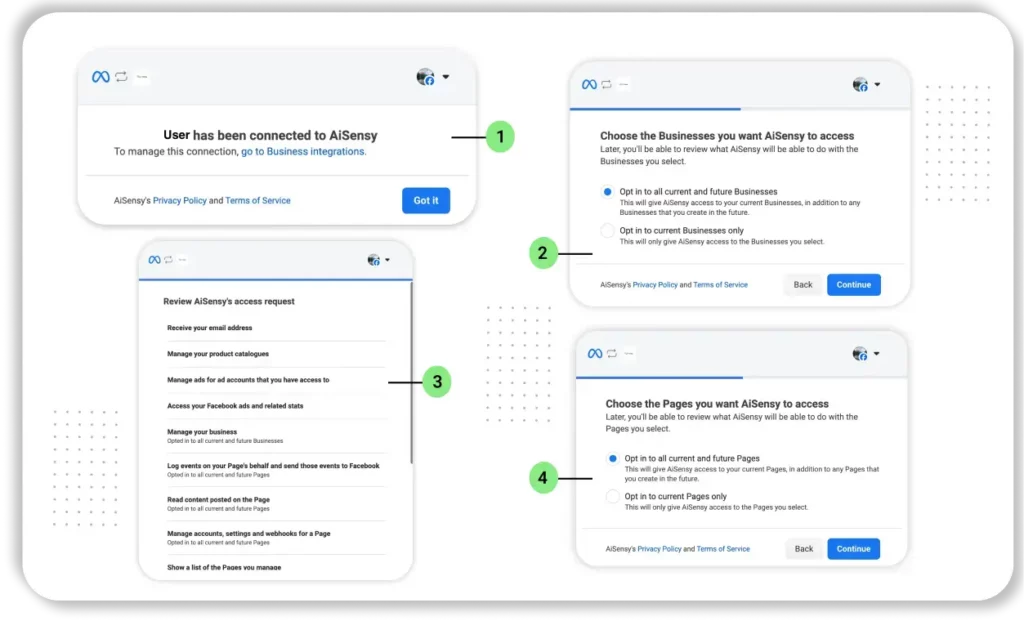
On the next screen, grant Vyapar Ads Manager the necessary permissions to set up the ad account for the page and business you want to run ads for.
Click “Save” and then tap “Got it.”
After this step, a new Ads account will be created for your business.
3. Select Facebook Ad Account
- Choose your Facebook Ad account and the Page you wish to use for running ads on Facebook/Instagram.
- Confirm the page you selected by clicking “Confirm.”
- Click “Send OTP” to link your WhatsApp API number to your Facebook page.
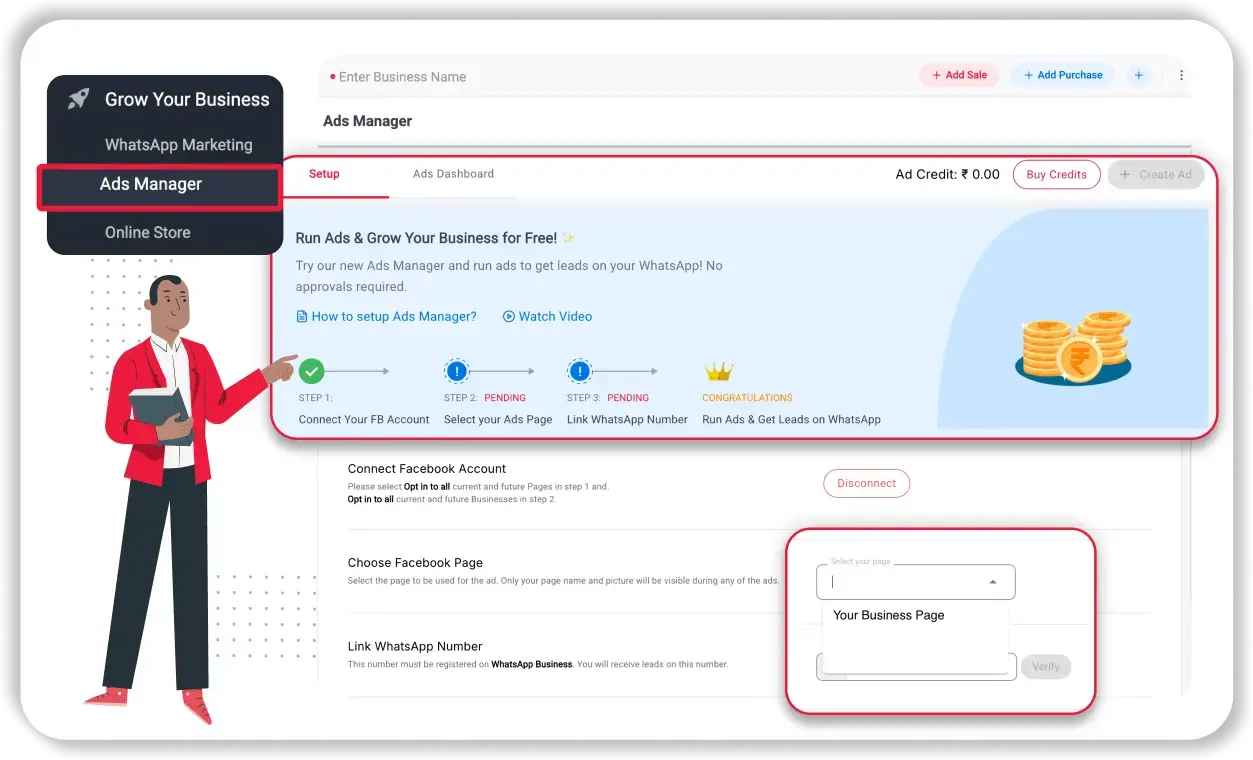
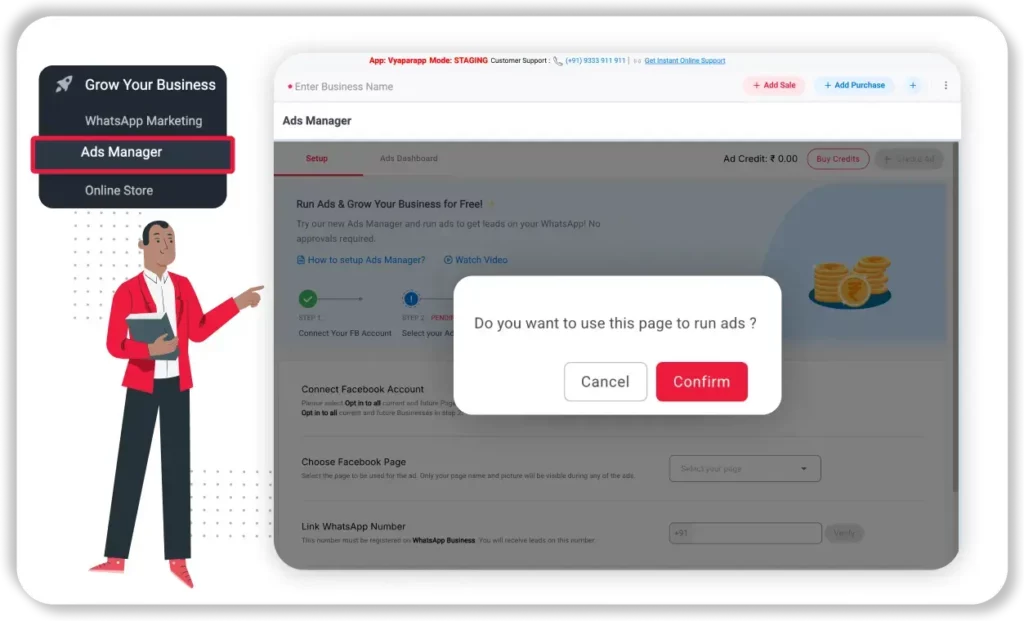
4. Link your WhatsApp API Number
An OTP will be automatically sent and fetched, connecting the Facebook page with the API number set as the primary number.

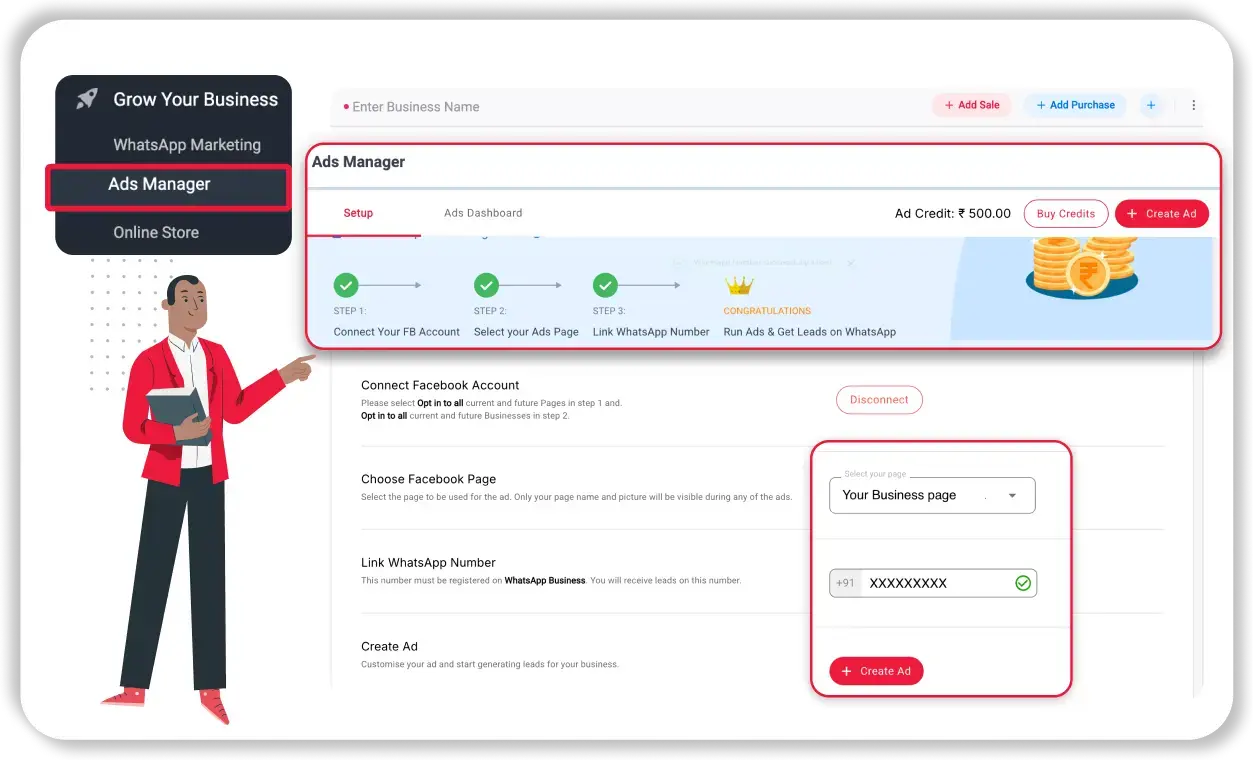
5. WhatsApp Number Linked Successfully
Linking your WhatsApp API number will enable the “Create Ad” button.
This completes your Meta Ads setup. Now, let’s create Click-to-WhatsApp Ads for your business. Click the “Create Ad” button at the bottom or top of the page.
6. Fields that You Need to Fill
On the next screen, fill in the required fields to create your Click-to-WhatsApp Ad.
Let’s create an Ad that entices users to click & reach your WhatsApp.
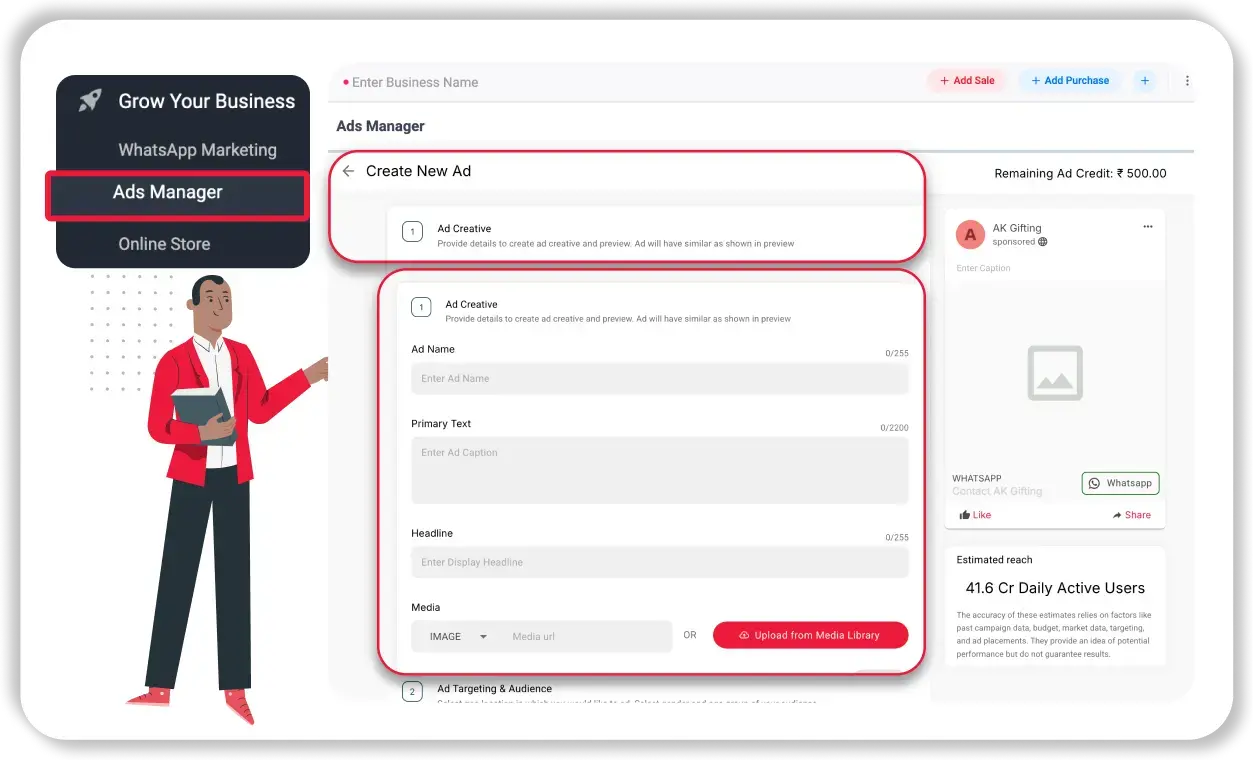
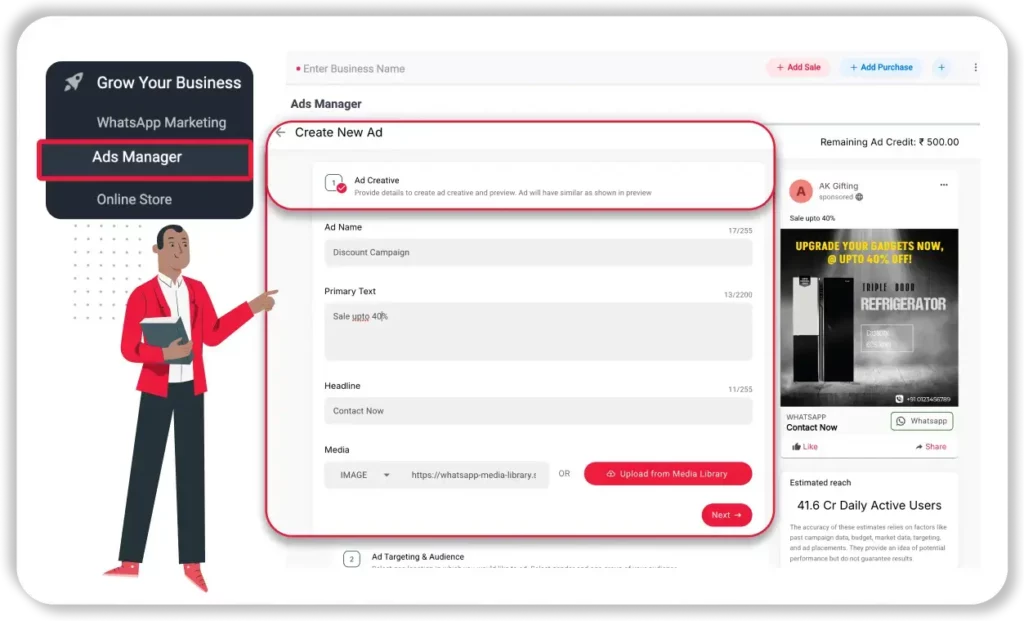
7. Create Your Click-to-WhatsApp-ad
Fill in these fields to create your Click-to-WhatsApp ad:
- Advertisement Name – Name your ad. The name can be anything.
- Advertisement Caption – This is the caption that will be visible to users to read. Make sure that you nail the copy to get maximum clicks on the ad.
Make sure to not use any special characters as Facebook restricts their use while creating the Caption for your Ad.
- Website Link – Here, add the link to your website.
- Headline – This is the Headline that will appear in Bold beside the clickable WhatsApp icon.
- Media – This is the image that the users will view while interacting with your Click-to-WhatsApp Ad. You need to upload a 1080×1080 (square) dimension image to Vyapar Ads Manager’s Media Library.
After filling in these details, verify once before proceeding to the next step.
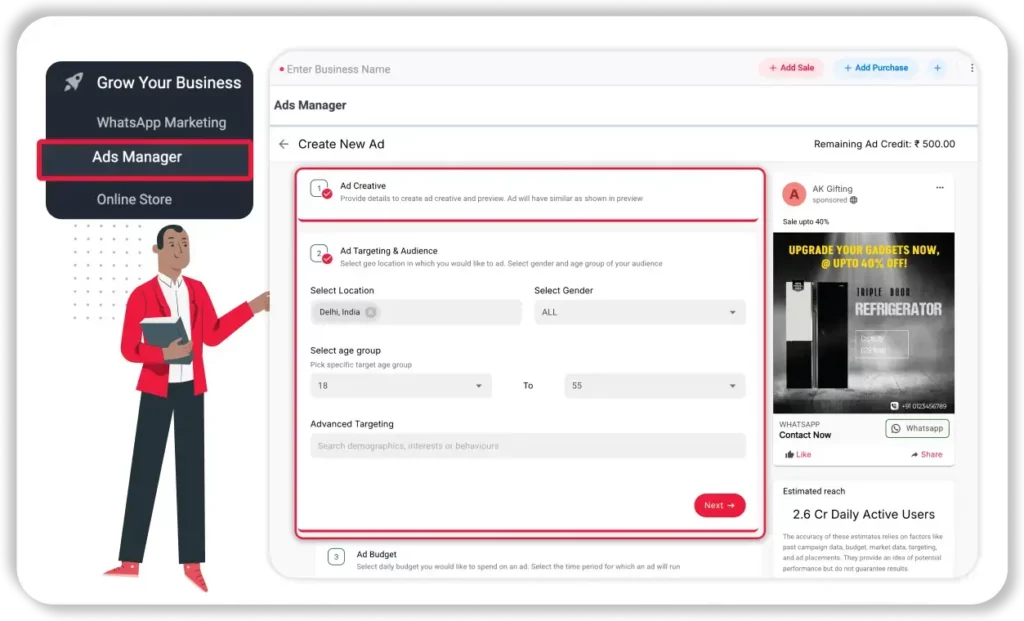
8. Fill in Your Ad Demographics & Targeting
Next, feed in the demographics of the audience you wish to target.
Add the locations where you wish to run your Facebook and Instagram Ads, gender & your audience’s targeted age group.
You also get the option to select detailed targeting based on users’ Demographics, Interests and behaviors.
To enter details for advance targeting, enter a keyword and the related Demographics, Interests and behaviors will pop up.
9. Select a Budget
Next, select your per-day budget & duration of the advertisement.
Once you pick the budget & duration, you’ll get a total estimated budget for your Click-to-WhatsApp ad.
After picking your budget, click Next.

10. Click Create to Publish Ad
Once you’ve verified your ad details, click Create to submit your Ad for approval.
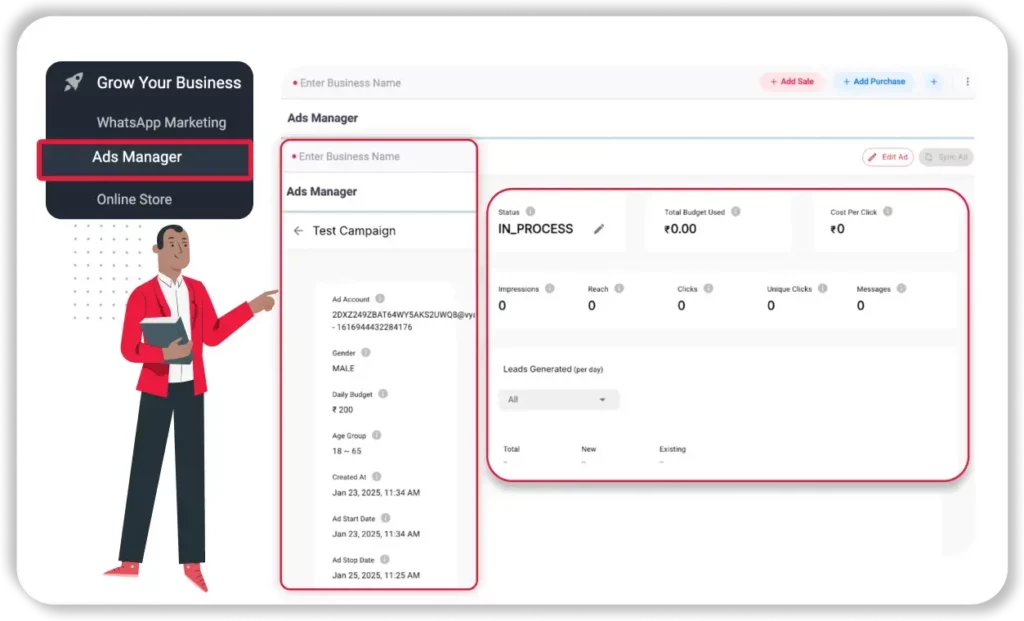
11. CTWA Ad in Progress
- Go to Ads Manager to view your Ad status.
- Click the Sync Status button to update your ad status.
- Generally, in 5 minutes, you’ll see the status of your ad as In Process.

12. Your CTWA Ad is LIVE 🎉🎊
Once the Ad is created, it is reviewed by Meta to make sure it is compliant with all Meta Ad Policies.
During this, you will see the status Pending Review
Sit back & relax.
Facebook generally takes 15–20 minutes to verify, approve/reject your Ad content.
In case your Ad gets rejected, you can view the rejection reason and the status. You can also connect with our team to check the reason for disapproval.
13. Monitor Your Ad Analytics
Once the ad becomes active, you can monitor the analytics by clicking on the ad.
That’s it!
It’s time to start creating ads on Facebook/ Instagram via Vyapar Ads Manager & drive leads to your WhatsApp Business account.


Reach Out Us: