Trusted by 10+ Million Businesses
Free GST Invoice Format
Download Excel, Word & PDF Templates
Everything a GST-registered business needs to issue a proper tax invoice. They include all fields for GST compliance – GSTIN, HSN/SAC code, CGST/SGST/IGST breakup, and place of supply.
Free Downloads
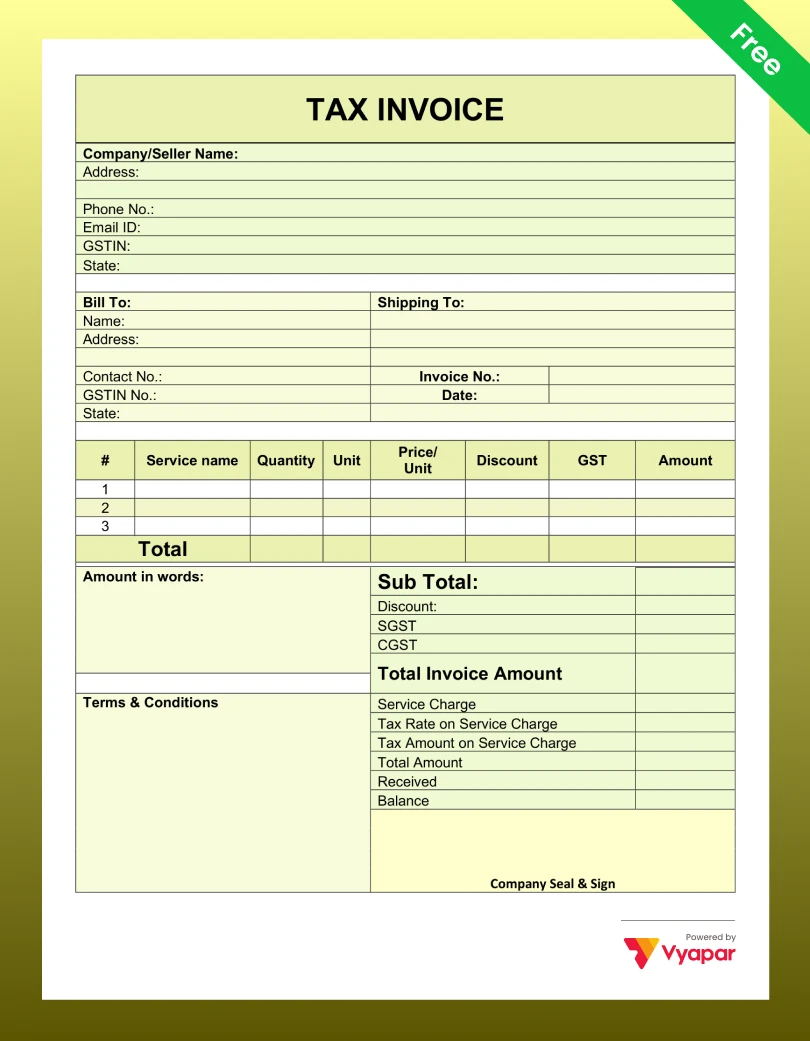
GST Invoice Templates – Free Download
All templates below are completely free. Pick the format that works for your business and download in one click.
Filter by Format
Word
Excel


No templates found
Try adjusting your filters to find the templates you’re looking for.
WHAT IT IS
What is a GST Invoice?
A GST invoice, officially called a ‘tax invoice’ under the GST Act, is the legal document a GST-registered business issues when it makes a taxable sale. It records what was sold, how much it cost, and how much GST was charged.
The invoice is important for two reasons. First, it proves the sale happened, and the right tax was collected. Second, it lets the buyer claim Input Tax Credit (ITC) – meaning they can deduct the GST they paid from their own GST liability. Without a properly formatted GST invoice, the buyer loses this benefit, and they will often refuse to work with you.
In other languages, the GST invoice is also called a ‘GST bill’, ‘tax bill’, or ‘kachcha bill with GST’. All of these refer to the same document.
Quick Guide
How to Use a GST Invoice Format
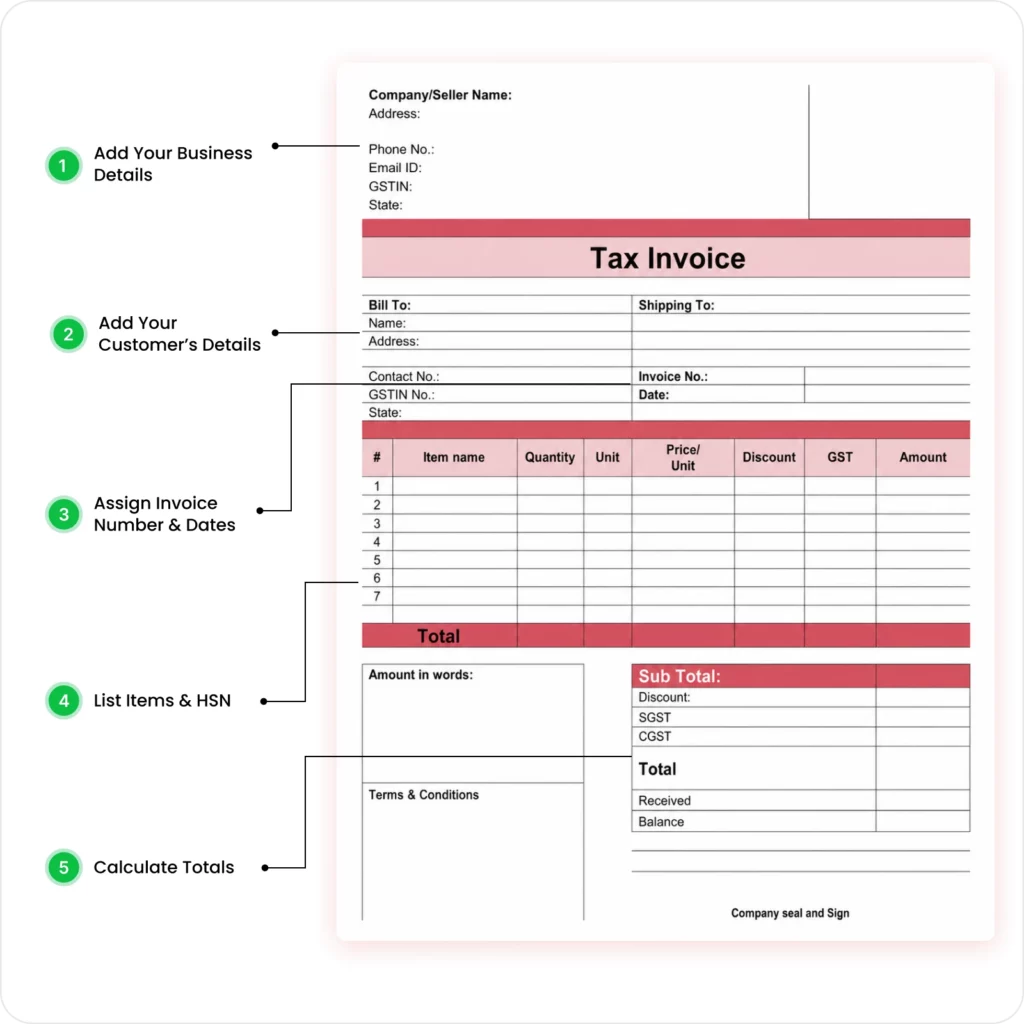
01
Download Your Free Format
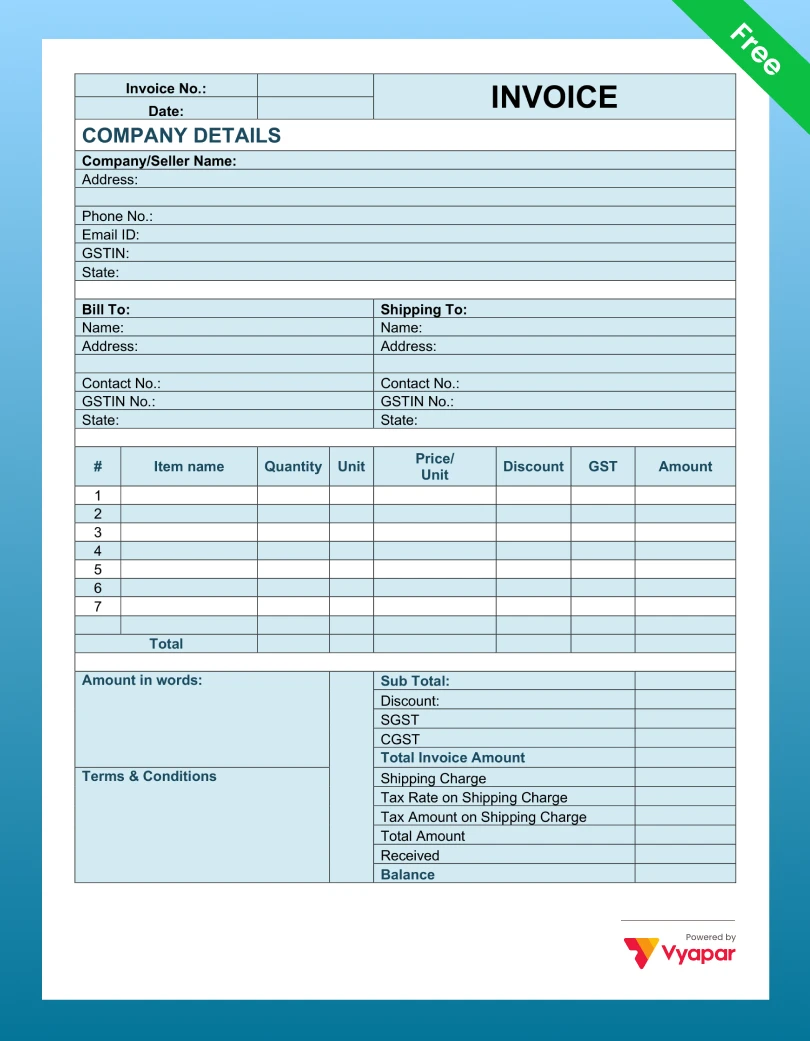
Download our Simple GST Bill Format in Excel, PDF or Word from this page.
02
Add Your Business Details
Open the file and enter your company name, logo, registered address, contact information, and your GSTIN.
03
Add Your Customer’s Details
Fill in the client’s name, billing address, shipping address, and their GSTIN (This is mandatory for them to claim ITC).
04
Assign Invoice Number and Dates
Add a unique, sequential Invoice Number (e.g., 001, 002) and the Date of Issue.
05
List Items, HSN, and Calculate Totals
Add a detailed list of goods/services, including the HSN/SAC Code, Quantity, and Rate. Manually (in Word) or automatically (in Excel) calculate the Subtotal, CGST, SGST/IGST, and the final Grand Total.
06
Authorise, Save as PDF, and Send
Add your authorised signature. Save the file as a PDF (it’s more professional) and send it to your customer.
Understanding The Basics
Key Components of GST Invoice Format in India
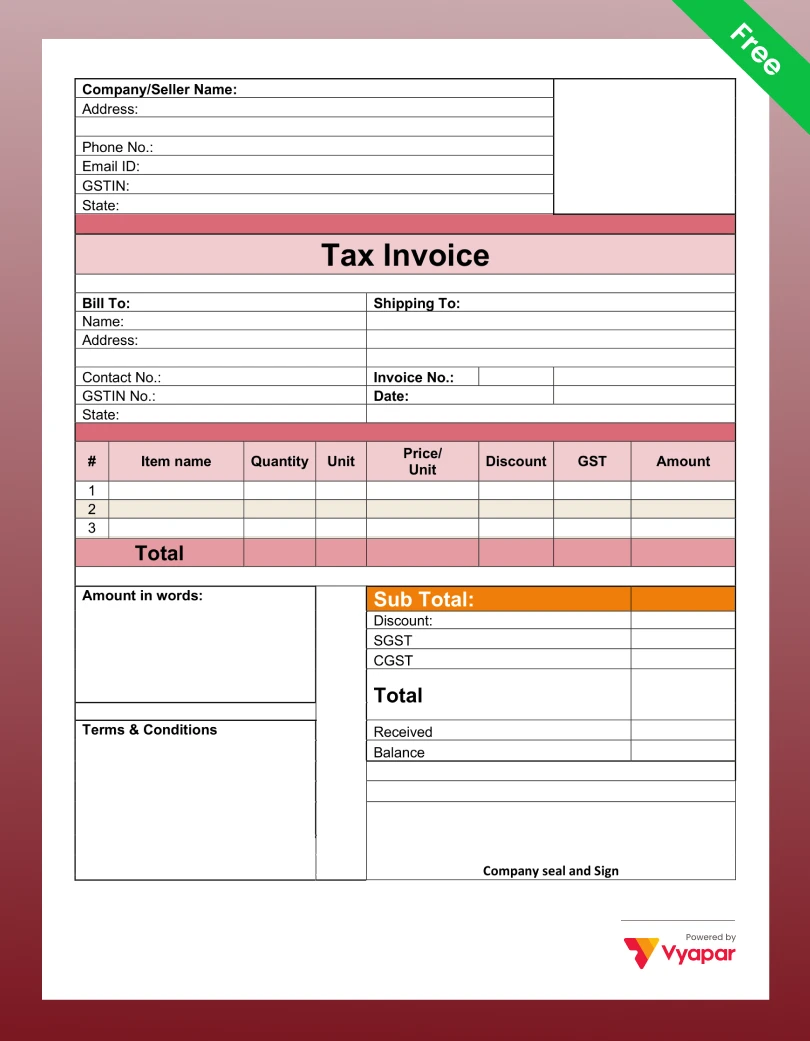
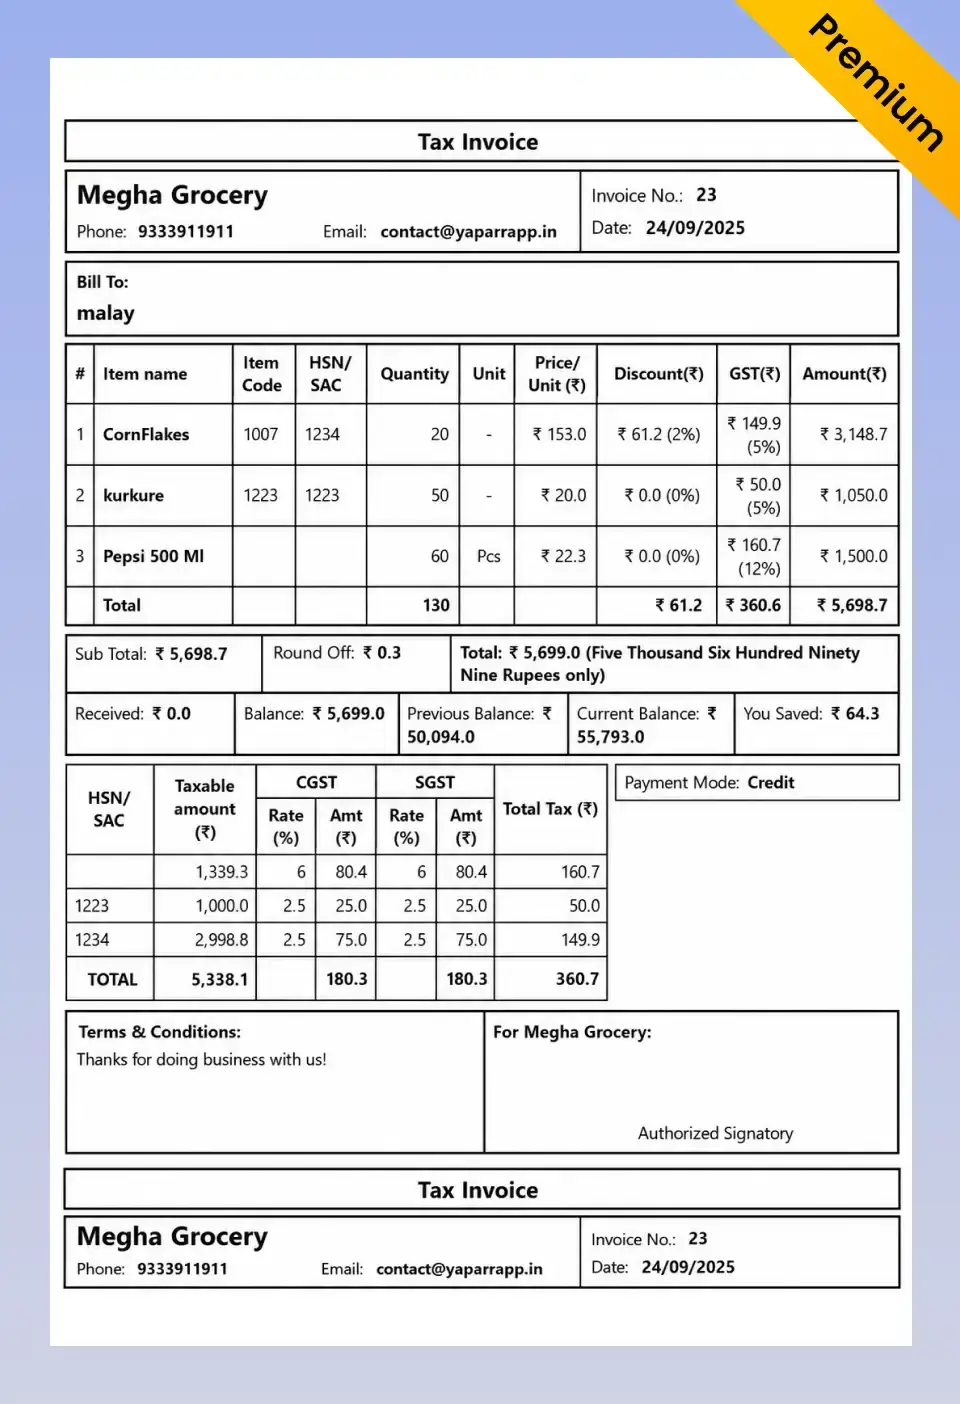
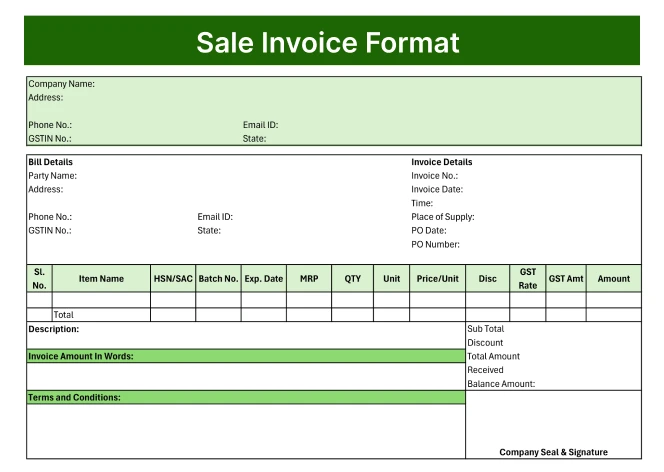
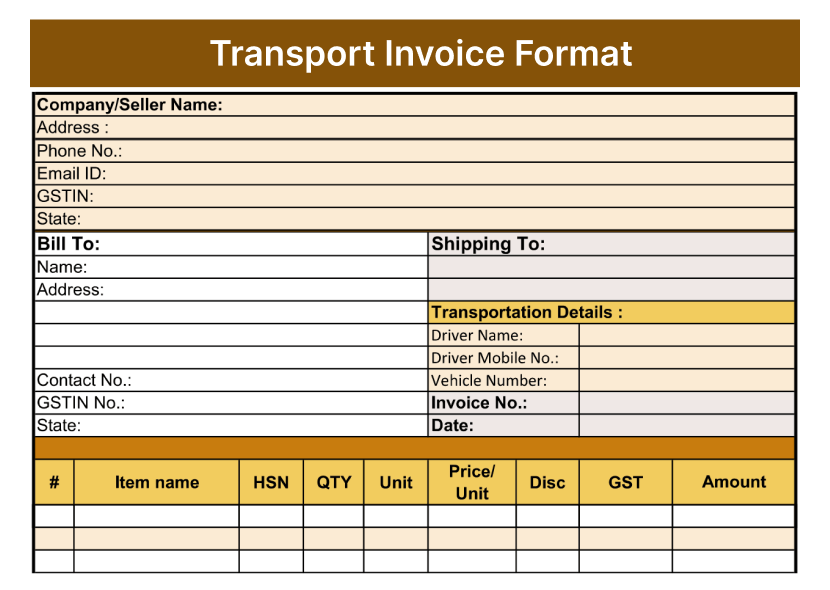
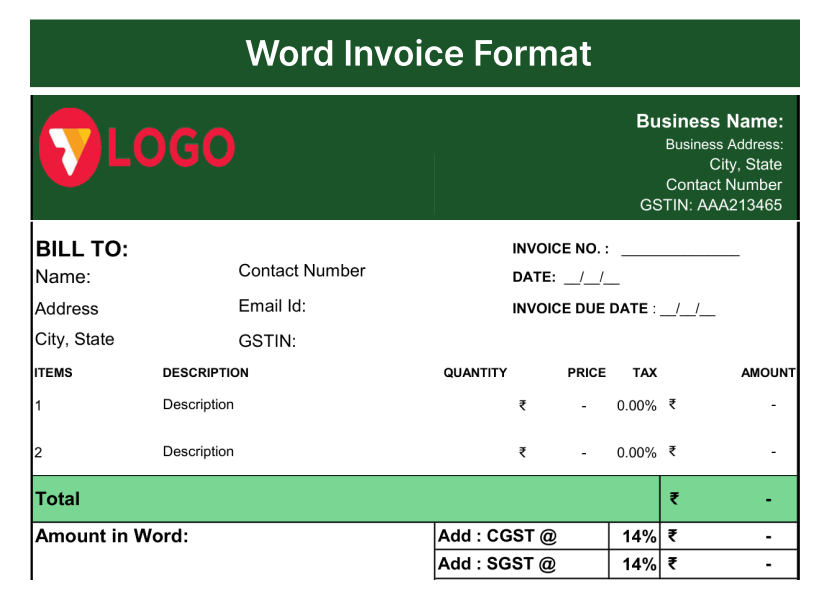
Under Section 31 of the CGST Act and Rule 46 of the CGST Rules, every tax invoice issued by a GST-registered business must include these fields. A missing field can make your invoice invalid – meaning your buyer cannot claim ITC, and you may face penalties during an audit.

Supplier Details
Include your legal business name, registered address, and GSTIN exactly as mentioned on your GST registration certificate.
Invoice Details
Add the buyer’s name, billing address, GSTIN (for B2B invoices), and state code where applicable.

Buyer Details
Mention invoice number, invoice date, and place of supply to determine applicable GST treatment.

Product or Service Details
Enter item description, quantity, unit, rate, taxable value, and HSN or SAC code.

GST Rates and Reverse Charge
Include CGST, SGST, or IGST rates, reverse charge details, and additional charges if applicable.

Final Invoice Value
Show the final invoice amount after adding taxes and all applicable charges.
CHOOSING RIGHT FORMAT
Which GST Invoice Type Does Your Business Need?
DIFFERENCE
Regular Invoice vs GST Invoice – What Is the Difference?
Regular
Invoice (Non-GST)
- Used by businesses not registered under GST
- No GSTIN required from either party. Neither buyer nor seller needs to provide a GSTIN on the invoice.
- No HSN/SAC code needed
- No tax breakup required
- The buyer cannot claim Input Tax Credit. This invoice does not allow ITC claims.
- No legal format mandated
- No e-invoicing compliance needed
GST Tax
Invoice
- Used by all GST-registered businesses
- GSTIN of the seller is mandatory; buyer’s GSTIN is mandatory for B2B
- HSN/SAC code mandatory for all items
- CGST, SGST, and/or IGST must be shown separately
- The buyer can claim ITC if the invoice is valid and GST is paid
- Format mandated under CGST Rule 46
- E-invoicing mandatory above ₹5 Cr turnover (B2B)
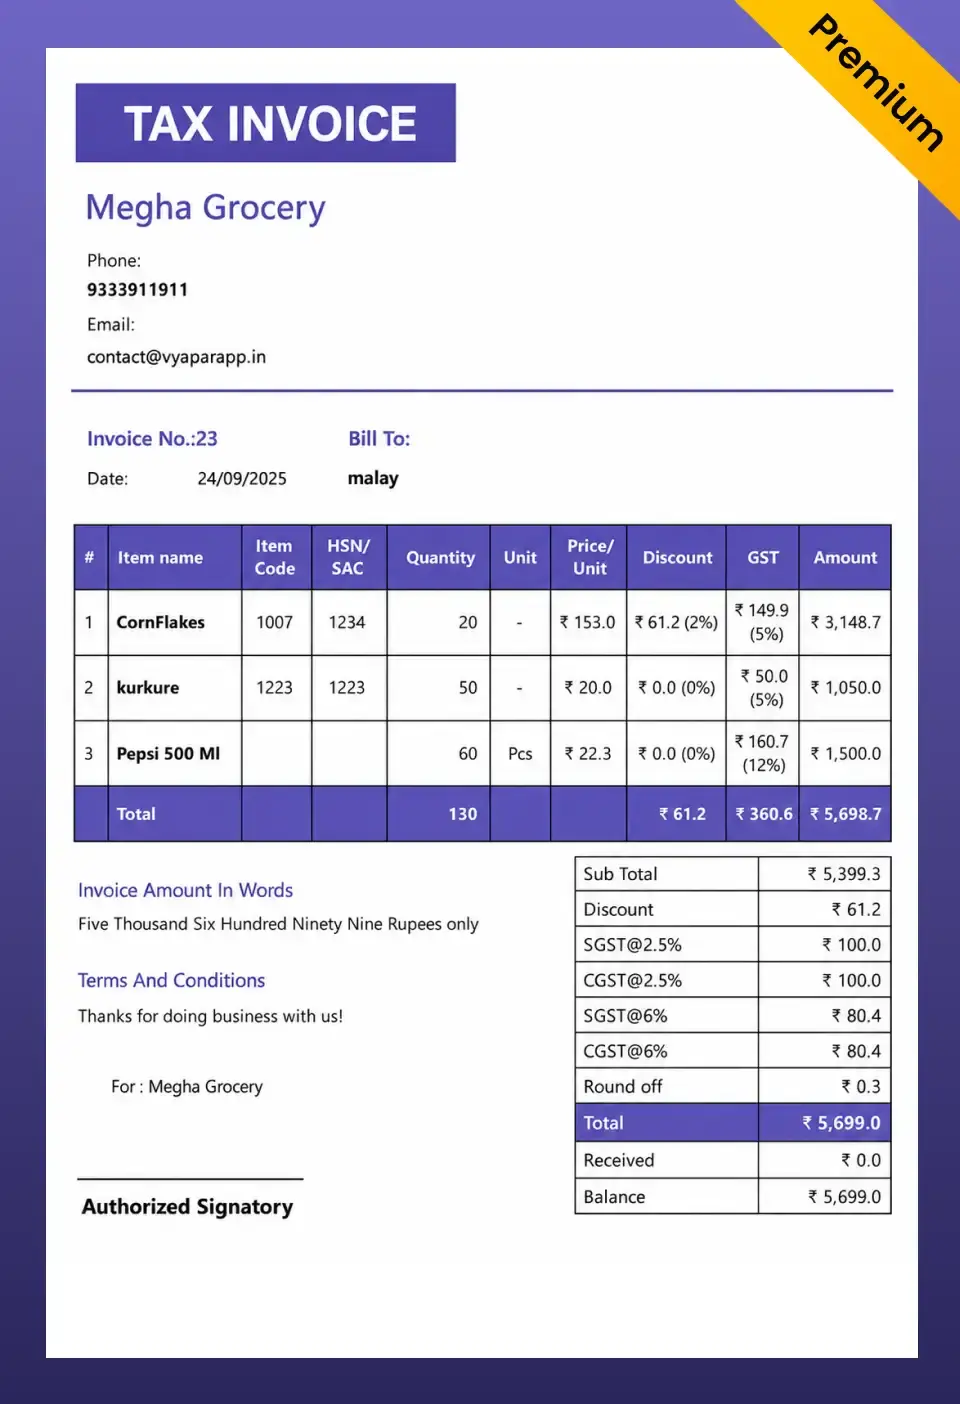
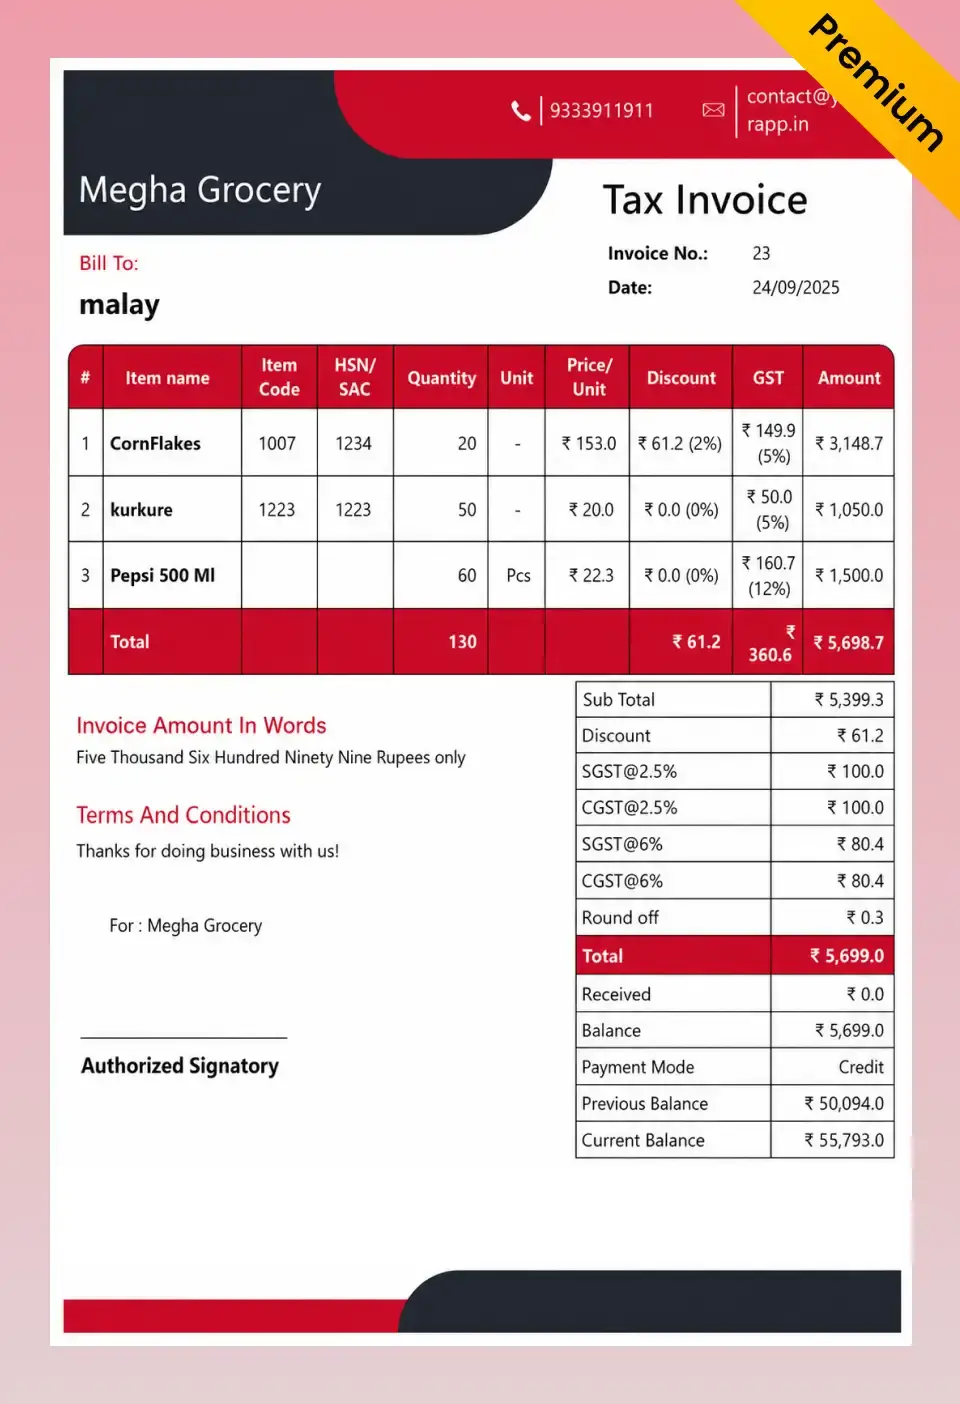
Premium Collection
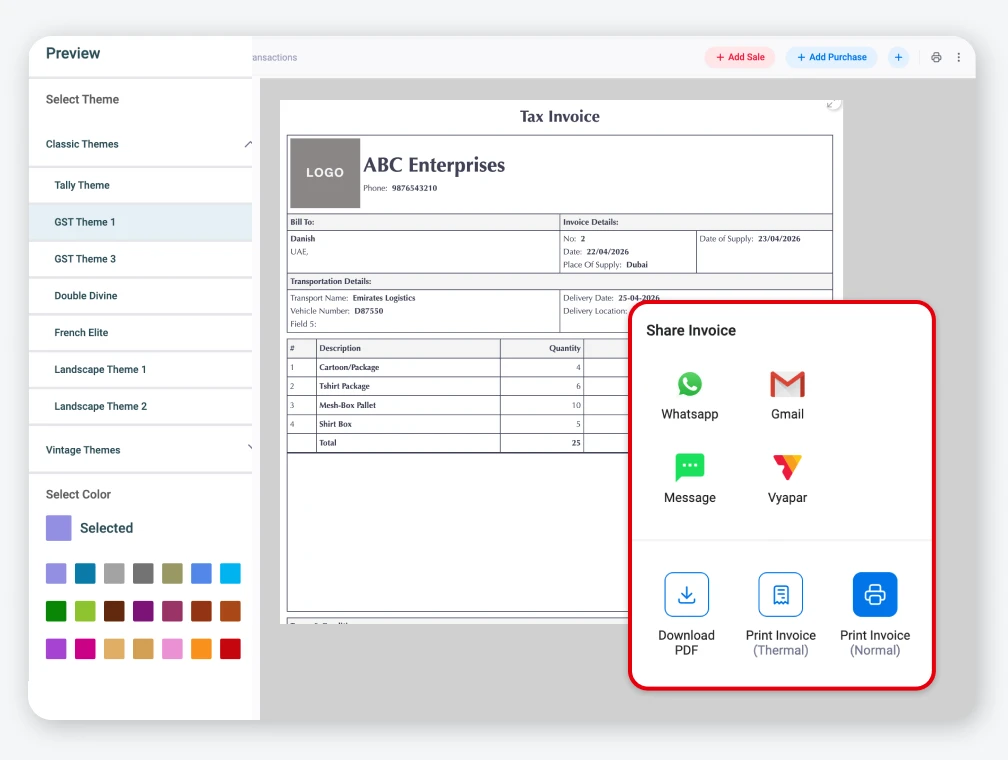
Premium GST Invoice Templates
If you want a GST invoice that makes your business look premium – with custom colours, logos, and modern layouts, download the Vyapar App.
French Elite
Double Divine
Landscape
Go Beyond Templates
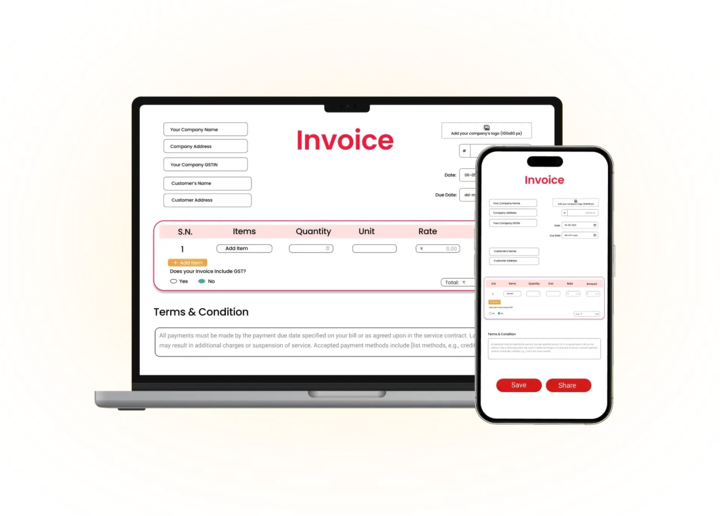
Stop Filling Templates Manually. Let Vyapar App Do It.
More than just formats – a complete business management solution
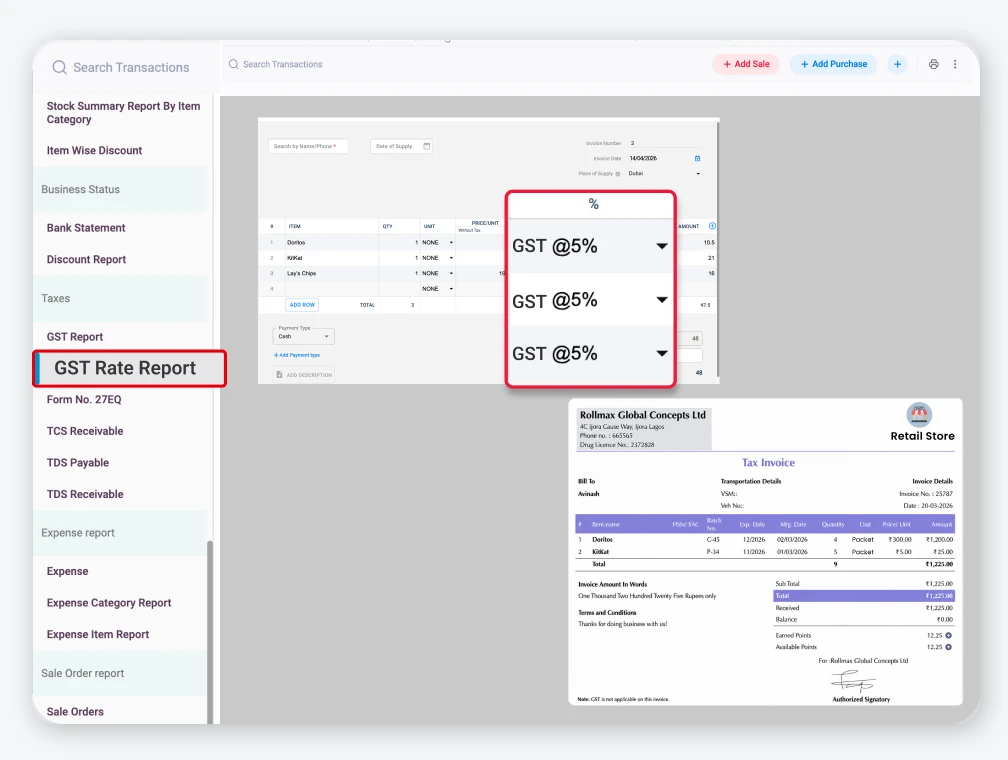
Auto GST Calculation
Calculates GST automatically and reduces manual effort.
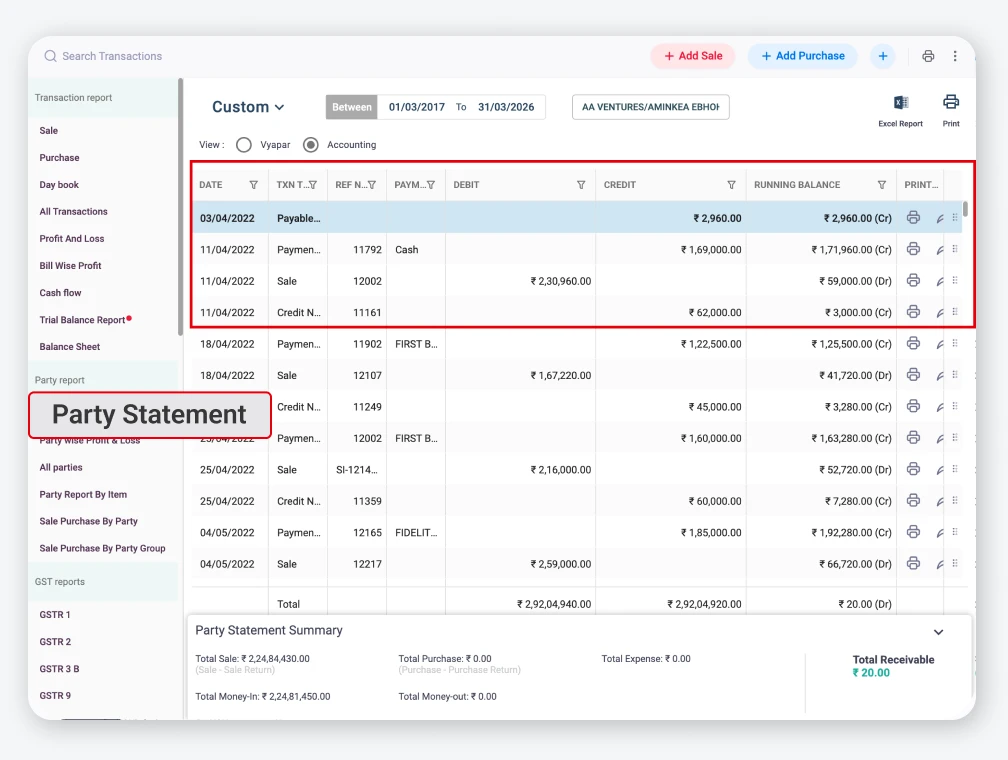
Customer Database
Saves customer details for faster billing.
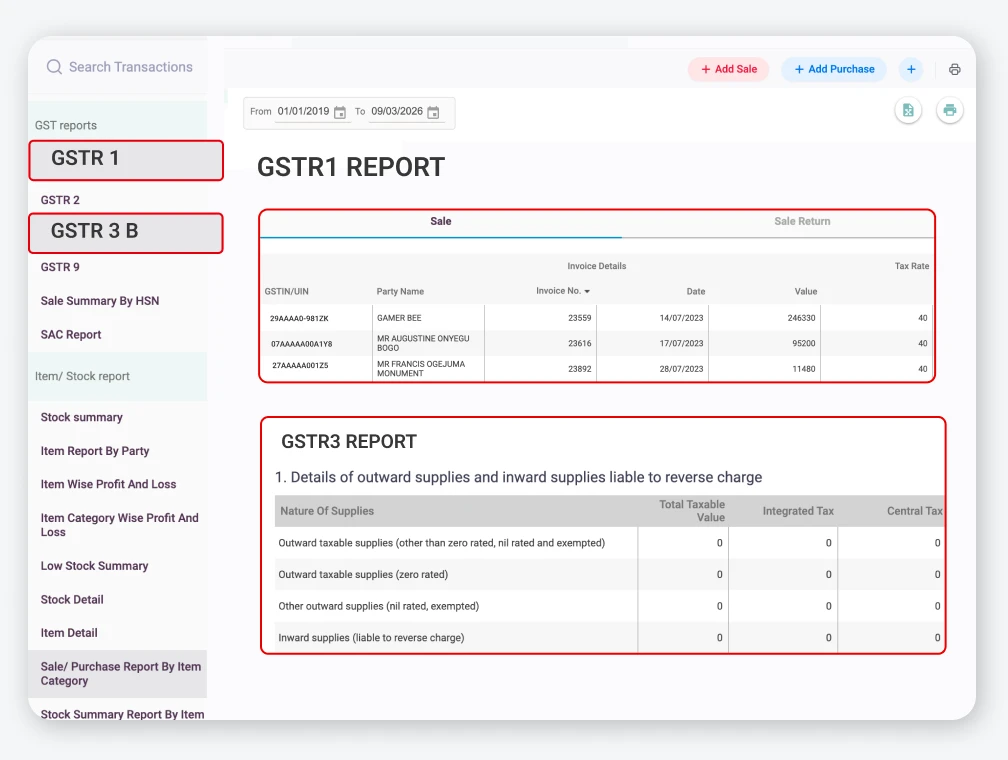
GST Reports
Creates GST reports for easier tax management.
Everything you need to run your business
- Auto GST calculations
- Inventory management
- Payment reminders
- Multi-device sync
Available in Android, iOS, Mac and Windows

Got Questions?
Frequently Asked Questions
Find answers to common questions about GST Invoice formats
What are the mandatory fields in a GST invoice as per Rule 46?
Under CGST Rule 46, a GST invoice must contain: supplier’s name, address, and GSTIN; a unique consecutive invoice number; invoice date; recipient’s name, address, and GSTIN (for B2B); place of supply; HSN or SAC code for each item; description, quantity, and taxable value of each item; applicable GST rates and amounts (CGST, SGST, or IGST); total invoice amount; and whether the tax is payable under reverse charge. Missing even one of these can invalidate the ITC claim for your buyer.
Can I use a Word or PDF template instead of an Excel template for GST invoicing?
Yes, you can. All three formats – Excel, Word, and PDF are legally valid for GST invoicing as long as they contain all the mandatory fields. The difference is practical. Excel calculates taxes automatically using formulas, which reduces the likelihood of errors. Word lets you customise the layout easily. PDF is good for printing and sharing on WhatsApp because it cannot be accidentally edited. For businesses issuing 5 or more invoices per day, an automated tool like Vyapar is recommended over any static template.
Can a composition dealer issue a GST tax invoice?
No. A Composition scheme taxpayer cannot issue a GST tax invoice. They must issue a ‘Bill of Supply’ instead. A Bill of Supply does not show any GST amount because composition dealers pay GST on a flat rate from their own pocket – they cannot collect it from customers. If a composition dealer issues a tax invoice by mistake, it can lead to legal complications. Always check your registration type before issuing any document.
Can I create a GST invoice for free without downloading any software?
Yes. You can use the free Excel, Word, or PDF templates from this page – no registration or software needed. You can also use Vyapar’s free online GST invoice generator at vyaparapp.in/invoice-generator to fill your invoice details online and download a PDF instantly. For businesses that issue more than a few invoices a month, the Vyapar App automates the entire process, including tax calculation, customer records, payment reminders, and GSTR-1 reports.
What happens if my GST invoice has an error? Can I cancel it?
You cannot ‘delete’ a GST invoice once issued, especially if it has been reported in GSTR-1. To correct a mistake, you issue a Credit Note (if you overcharged) or a Debit Note (if you undercharged). The credit or debit note must reference the original invoice number and date. For e-Invoices, there is also an ‘Invoice Amendment’ process on the IRP. If the invoice has not yet been reported in GSTR-1 and has not been sent to the buyer, you may be able to cancel it depending on your accounting software. Always keep a paper trail of any corrections.

Billing software in India for small businesses


